Saturday, September 24, 2011

Pumpkin Scones

It is officially fall.  I know this because not only the weather, but Starbucks has told me!  The Pumpkin Cream Cheese Muffins, Pumpkin Spice Latte's and Pumpkin Scones are out.... which means I try making them myself.


This past weekend was the monthly Bake Sale at church.  I got up early on Sunday morning to start making my Pumpkin Scones.  These scones are delish!  I even think they are better than Starbucks. (At least they seem fresher than the ones at the store.)  I was excited to take them to church and I never would have admitted it out loud before, but I was sure they'd be a huge hit.

Pride comes before the fall.

Apparently I should NEVER bake at 7am.  I took all of the ingredients out of the cupboard but inevitably forgot to add some very important ones.  Yes, salt and baking powder are very important for scones.  Of course, I didn't realize that I had done this until I took them out of the oven 15 minutes later and they had not risen even the smallest amount and were hard as a rock.

They can't be that bad, I tell myself.  So I taste one.  YUCK.  They were terrible.  We ended up taking Dunkin' Donuts to the Church Bake Sale.  I'm still a little ashamed, but Grant says I can give him the credit for the donuts.  What a good husband.

I redeemed the recipe for myself later that day by making the scones for a party that evening.  Without much further ado... here is the recipe for Pumpkin Scones.  (Just make sure you add ALL the ingredients.)

Ingredients:
2 cups all purpose flour
7 tablespoons granulated sugar
1 tablespoon baking powder
1/2 teaspoon salt
1/2 teaspoon ground cinnamon
1/2 teaspoon ground nutmeg
1/4 teaspoon ground ginger
1/2 cup pumpkin puree (homemade or canned)
3 tablespoons half and half
1 large egg
6 tablespoons cold butter

Plain Icing:
1 cup plus 1 tablespoon powdered sugar
2 tablespoons milk or half and half

Spiced Icing:
1 cup plus 3 tablespoons powdered sugar
2 tablespoons milk or half and half
1/4 teaspoon ground cinnamon
1/8 teaspoon ground nutmeg
pinch of ground ginger
pinch of ground cloves

Instructions:


  1. Preheat oven to 425 degrees F.
  2. Combine flour, sugar, baking powder, salt, cinnamon, nutmeg, cloves, and ginger in a large bowl.
  3. In a separate medium bowl, whisk together pumpkin, half and half, and eggs.
  4. Cut butter into cubes and add it to the dry ingredients.  Use a pastry knife or fork to combine butter with dry ingredients.  You want it to look like sand without any large chunks of butter visible.  You can also use a food processor (which I did) because it is so quick.
  5. Fold wet ingredients into dry ingredients, then form the dough into a ball.  Pat out dough onto a lightly floured surface and form into a 1-inch thick rectangle that is about 9 inches long and 3 inches wide.  Use a large knife or pizza cutter to slice the dough.  I like to make them much smaller than Starbucks (so you can have two).
  6. Bake 14-16 minutes on a baking sheet.  You can oil it, line it with parchment paper OR if you have non-stick cookie sheets like these (which are worth every penny) you don't need to line or grease the pan.
  7. While scones cool, mid the plain icing in a bowl.  I found a whisk to be just fine, but you can use a mixer if you prefer.  When the scones are cool, drizzle or paint a coating of glaze over the top of each scone.  I put the scones on a cooling rack on top of wax paper or plastic wrap to let the excess run over.  (See photo below) And there will be excess!
  8. As the icing firms up, prepare the spiced icing in the same manner as the plain icing.  Drizzle on top.  I like to do it just like Starbucks does in a criss cross pattern.  I just just a spoon and hold it above the scones as the icing drizzles over, but you can use a squeeze bottle or something else too.
Makes 6 Starbucks-size scones or 12 regular-size scones.


Enjoy!

Sunday, September 18, 2011

Green Thumb?


This summer I tried my hand at gardening for the first time.  Somehow I think that the basil I managed to grow in pots in my apartment over the last few years just didn't count.  No weeds to contend with.  No severe weather.  No critters that demolish plants before they even get a chance.

This lone tomato brings sheer delight!!  I actually squealed when I saw that my green, rock hard tomato was starting to turn red.  After failed carrots (planted them too close to one another), lettuce and broccoli (which may be fine, but they still look funny), I was hoping that these tomatoes would respond to all the love I've given them... and they did!

We picked this tomato over the weekend and it is a beauty!  Now I just have to decide what to make from it before it spoils.  And if the cold air and frost hold off a little longer, we have at least a dozen more on the vine waiting to ripen.

The problem is that this one tomato is making me feel like a better gardener than I really am.  Perhaps the satisfaction of it will be motivation enough next spring.  But this is still true: I hate pulling weeds, I have no idea what to do about bugs or how to protect plants from storms or hail (which we had plenty of this year).  In all honesty, I have no idea how we even got this one tomato (considering I once had 9... count them N-I-N-E tomato plants in the space that two are currently residing).

What do you think, too soon to start planning next year's crop??

Thursday, July 21, 2011

Projects, Projects, Projects!

Unemployment has been great to me!  Perhaps I am enjoying it a little too much and thus the lack of motivation to look for a job.  I've been keeping myself busy this summer with a trip to Colorado, accompanying our youth group on a trip to New Orleans, helping with VBS at church and many, many, projects around the house.


Trip to Colorado with good friends - I haven't laughed so hard in a long time!


Dining room chairs - Before


Dining room chairs after!


We celebrated our first anniversary!  Our anniversary date started as a picnic and then it started to rain.  We moved it to our porch and the rain became a tornado warning with no power.  So... we spent the rest of the evening sitting on old chairs in the basement with no power.  The candles are sitting on top of the de-humidifier.


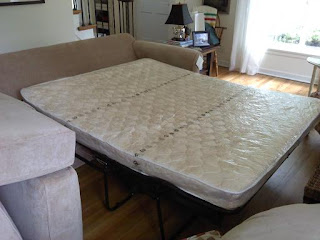
Our living room is now complete (and no longer has folding camp chairs in place of the sofa)


And SURPRISE!  It's also a bed. (Which we didn't order, but have decided is very nice to have)


The whole crew in New Orleans


Our backyard.


We have spent an abundance of time enjoying the porch!


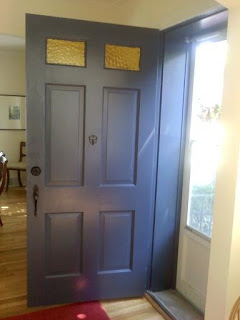
I painted our front door.  Once I can find a long enough ladder, the shutters will be next!


And, this week I re-grouted our bathroom floor. 


Even though I still have some clean-up to do, it is looking much better!


And, in the midst of all of this, I've even found some time to do a little knitting...


A friend of mine had a baby in May and she asked me to knit her daughter a baby cocoon for their newborn photos.  Isn't she precious?  I think she deserves her own post.  I am excited to meet her next week!

Gosh, I love days like these!

Saturday, June 18, 2011

You need to watch this!

Grant was skeptical when he heard the music and walked around the desk to look at the video on the screen.  You should watch this, you won't be disappointed.  Even Grant loved it.

Friday, June 10, 2011

Grant thinks he knows how to knit...

A few weeks ago we went to Loopy Yarns on our day in Chicago with Grant's parents and my mom.  Grant demonstrated on the BIG knitting needles that he has learned how to knit just by watching me.  The result was a new favourite series of photos!


Monday, June 6, 2011

Before and After

The last month or so has been FULL.  Grant graduated with his Master's, we said goodbye to our RA staff for the summer, I finished my job at the school, we moved out of our apartment (which has been my home for the last 4 years) and into our house, and we enjoyed the company of Grant's parents and my mom who each came to visit for 2 weeks (and who helped us SO much with all of the moving, settling-in and projects around the house).  Phew!

We have worked on so many projects in the house I don't think I could count them all!  I have tried to take some before and after shots of some of them (and even some in-progress pictures) and thought i'd share a few.  There will be more to come as we finish unpacking and deciding where we want to put everything!


Before: VERY old "matching Maytag's"


After: Beautiful NEW washer and dryer.


Before: Dirty, old doors with dirty, old doorknobs.  


We wanted to try to polish the doorknobs (they were brass plated), but it was impossible to get 60+ years of guck off of them.  So we painted them too!


After: Clean and pretty white doors (that now match the rest of the woodwork in the house) and black door knobs.


Before: Corner cabinets in the dining room and old light fixture.

(Some people seem very upset that we took these cabinets out so we feel the need to explain!  :-)  They looked great, but didn't hold much and were also pretty flimsy and poorly made.  They also covered up the vents for the room.)


I received a phone call one morning telling us that the dumpster was going to be removed later that day.  We asked if it could be delayed and my mom and I decided that that day would be demo-day.  We took out the corner cabinets and the ceiling on our porch (pictures below).


Sorry... I had to include this.  This was inside the dirty, dirty vent that was covered from the cabinet.  Eew!  That alone almost made taking the cabinet out worth it!


After: New light fixture (that was a wedding gift), room for our china cabinet and two corners!  The room surprisingly seems much bigger now!


We also hemmed the curtains in the house so they are no longer 20" too long!


Before: The musty, damp ceiling tiles in the screened-in porch.


While we were taking this down, several old Christmas cards and other strange things fell out of the ceiling.


After: Open rafters.  Eventually we will paint them (and the inside of the porch).


Like I said, there are even more projects that we have been working on so I'll post more pictures soon!  

Thursday, May 5, 2011

It's improving

Just a few update pictures of the work on the house!  The back stairs will be rebuilt on Monday.


Grant's parents arrived yesterday and are staying in the house!  Check-outs are happening as I type and I have ONE paper left to complete and Grant's graduation is on Saturday.